0
No matter how big your closet, it always seems that you can use some extra space. Hanging your clothes on the bar is one way of keeping your clothes in order, but it does nothing for all of the other things that usually wind up in a big and messy pile on the floor. To help solve that problem, you may need to install some shelves. You can take the easy way out and simply purchase a pre-made shelving unit that sits on the floor or you can buy a set of shelves that have been factory designed and come with all the necessary hardware to hang them. Those options are okay for some, but if you want a custom closet with the most shelf space, the only way to go is to build your own closet shelving. Building your own closet shelving is not a very difficult project. Probably the most difficult part of the job is emptying out your cluttered closet so you have room to work. The first thing you need to do is decide the type of shelving you want to install. There are a number of choices including coated steel wire shelving, glass and wood. In this case, I will focus on building closet shelving out of wood. You must carefully measure the dimensions of your closet and the wall or walls where you want the shelving to go. White or Yellow Pine makes a good choice for shelving as it is strong, looks nice, can be easily painted and does not cost a lot. There is no need to get the more expensive premium pine with no knots because, after all, these shelves will be hidden in your closet. Go down to the local home improvement center, select your lumber and have some one cut them to the proper length. Buy some brackets and any hardware you might need to hang the shelves. Once you are ready to start. Draw lines in pencil on your wall where you want to place the shelves. Make sure to use a level so the line is straight. Next, screw in the brackets to the wall, placing them every 2 to 3 feet apart. The closer you space them, the more weight your shelves will support. If you have a hollow wall and can't find a stud, be sure to use a wall anchor. Finally, take the boards and place them on top of the brackets. Use a couple of small screws to secure the shelves to the brackets. Painting or staining is optional
What else can I help you with?
What is wire closet shelving typically coated with?
Wire closet shelving is usually coated with a plastic lining. Some of them use rubber.
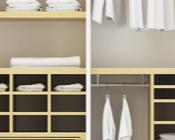
Closet Shelving?
form_title= Closet Shelving form_header= Create more space with closet shelving. How many shelves do you want to install?*= {1, 2, 3, 4, 5, 6, 7, 8, 9, 10, More than 10} What are the dimensions of your closet?*= _ [50] Do your closet doors slide?*= () Yes () No
How can I efficiently plan and execute a closet shelving installation project in my home?
To efficiently plan and execute a closet shelving installation project in your home, follow these steps: Measure the closet space and determine the shelving layout. Research and purchase the necessary shelving materials and tools. Clear out the closet and prepare the space for installation. Install the shelving according to the layout plan. Organize and arrange your items on the new shelves. Clean up and enjoy your newly organized closet space.
Shelving systems for tall women's clothing?
California Closets offers home closet and organizational shelving that are customizable for your closet and needs. You can use their store locator to find the closest retail store near you or you can browse their online selection at www.californiaclosets.com.
Can I build my own Adjustable Wire Shelving easily?
Adjustable wire shelving kits are very useful and not very expensive at all. I would suggest looking at Home Depot or Lowes for a wire shelving kit. These kits are easy to install and will do wonders to organize your closet.
Recommended closet shelving systems for children's clothes?
A great shelving and closet organizing system for children around 4 feet tall is the Platnium Kids Closet by Elfa. It features shelves, rods perfect for your little fashion fan.
How can I effectively plan and execute the process of installing closet shelving in my home?
To effectively plan and execute the process of installing closet shelving in your home, follow these steps: Measure the closet space to determine the size and layout of the shelving. Choose the type of shelving material that best suits your needs and budget. Purchase all necessary tools and materials, such as shelves, brackets, screws, and a level. Clear out the closet and remove any existing shelving or rods. Install the shelving brackets securely into the wall studs using a drill. Place the shelves on top of the brackets and secure them in place with screws. Use a level to ensure the shelves are straight and evenly spaced. Organize your items on the shelves and enjoy your newly organized closet space.
What shelving can be purchased as an alternative to wire shelving?
Instead of wire shelving, have you considered using plywood or maybe heavy duty plastic shelving? These are two alternatives that would really look nice in a closet and are long lasting.
How do you hang Closet Maid shelving?
Before hanging Closet Maid shelving you will need to measure the closet and purchase materials needed. ShelfTrack should be installed on studs where possible. Where studs are not possible, you should use toggle bolts to ensure secure installation. Once the track has been installed no more than 24 inches apart, then hang shelving.
Where can I find high quality shelving for a master bathroom closet?
You can find all sizes of bathroom shelving at a major home improvment store.
How can I efficiently install shelving in my closet to maximize storage space?
To efficiently install shelving in your closet to maximize storage space, start by measuring the dimensions of your closet and planning the layout of the shelves. Use adjustable shelving units to customize the space according to your needs. Install the shelves at varying heights to accommodate different items and utilize the vertical space. Consider adding hooks or baskets for additional storage options. Make sure to secure the shelves properly to ensure they can support the weight of your belongings.
What are the best shelving options for organizing a closet effectively?
The best shelving options for organizing a closet effectively are adjustable shelves, wire shelves, and built-in shelves. Adjustable shelves allow for customization to fit different items, wire shelves provide good ventilation and visibility, and built-in shelves maximize space utilization. Choose shelving that suits your needs and helps keep your closet organized.